Quick start
Install a local Crunch Node (7:15)
crunch-node package, which includes a CLI for scaffolding workspaces:
Prerequisites
Before starting, ensure you have:- Docker and Docker Compose installed
- Python 3.10+ and uv installed
makecommand-line tool
Choose a pack (recommended)
Packs are prebuilt overlays for common competition types. Start by listing available packs:Scaffold your workspace
Create your workspace with a pack:If you omit
--pack, the default scaffold is used. We recommend starting with a pack to get a
stronger baseline for scoring, examples, and UI configuration.Agentic Crunch Node building (recommended)
The generated workspace includes.agent/ context and implementation guidance so you can build your
challenge in an agentic loop instead of editing everything manually.
A practical loop is:
- Choose a pack close to your use case
- Ask your coding agent to adapt
node/config/crunch_config.py,challenge/starter_challenge/tracker.py, andchallenge/starter_challenge/scoring.py - Validate quickly with
make testandmake verify-e2e - Iterate until leaderboard and metrics match your intended behavior
Start the stack
From thenode/ directory:
What gets started
This launches a complete Crunch ecosystem on your local machine — core workers handling the full pipeline from data ingestion through scoring and reporting, plus a Model Orchestrator, PostgreSQL, and a web dashboard.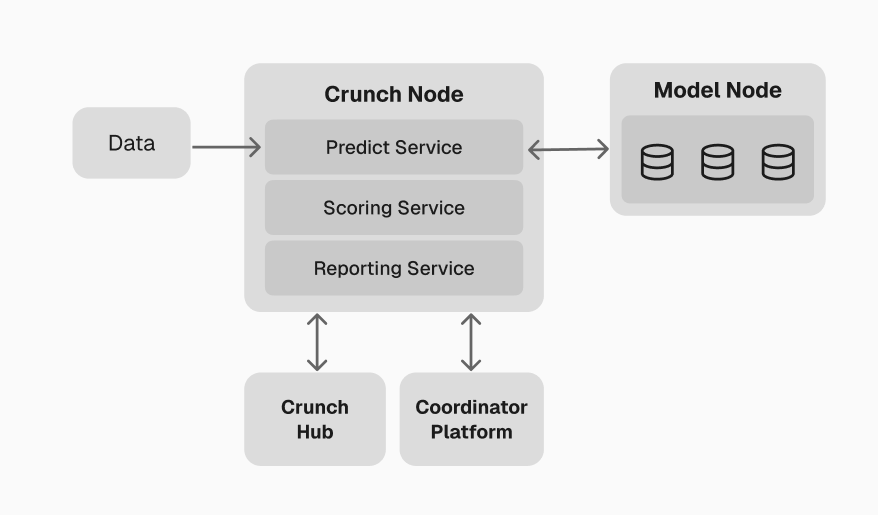
High-level overview of the local environment
For a detailed breakdown of each worker and service, see the
Crunch Node Example.
Coordinator Platform
Once your local stack is running, access the Coordinator Platform at http://localhost:3000. This is the primary interface for managing your Crunch — both locally and in production.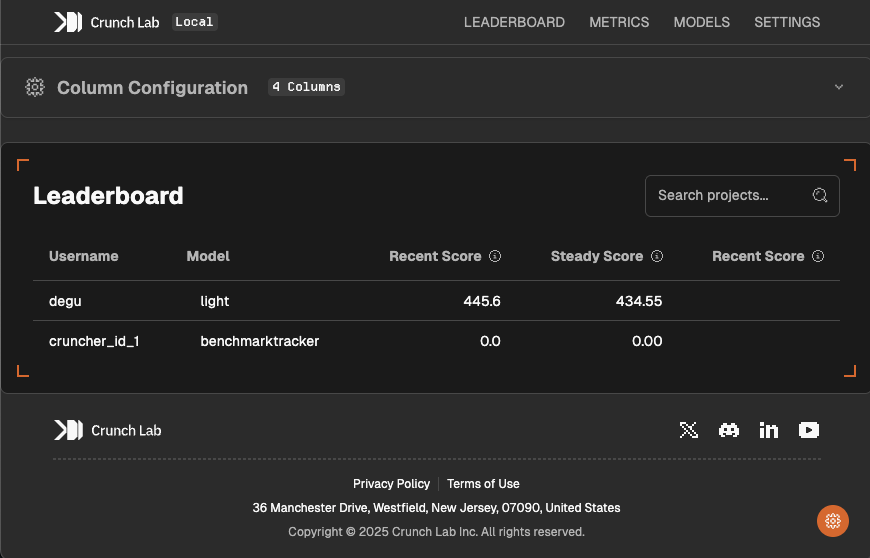
Coordinator Platform dashboard
- Leaderboard — customize ranking columns and display
- Model management — upload, monitor, and manage participant models
- Metrics — real-time performance analytics and scoring history
- Checkpoints — create and manage reward distributions
- Feeds — monitor active data feeds
- Logs — view Coordinator and Model Node activity in real-time
Next steps
With your local environment running, follow the remaining guides in order to understand the reference implementation, then build and deploy your own Crunch.1
Understand the Crunch Node
The Crunch Node Example walks through the working
implementation that runs by default — covering the worker pipeline, data feeds, prediction
collection, scoring, and reporting.
2
Understand the challenge package
The Challenge package example explains the participant-facing
repository — including the model interface, scoring helpers, and quickstarters.
3
Build your custom Crunch
Define your own Crunch by customizing the prediction task,
scoring function, and challenge package.
4
Set up your wallet
Create a Solana wallet and register as a Coordinator
through the Coordinator Platform.
Next: Crunch Node Example
Walk through the default implementation to see how all workers and services fit together.